One of the joys of making espresso is all the things that can be done with that delicious beverage. Of course, drinking straight espresso can be a delicious way to enjoy coffee, but that steam wand on the machine is there for a reason! Let's put it to work!
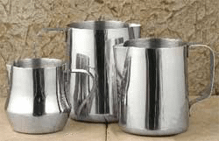 |
The PreparationWhen steam, under pressure, is applied to milk, changes in the milk take place. The milk gains body as well as sweetness without adding sweetener of any sort. At the same time it increases in volume, so the process is often referred to as stretching. To begin, it is important to choose a steaming pitcher of the proper size and shape. The size is determined by the amount of milk to be stretched. It should fill the pitcher to a depth of about .75 to 1 inch. Too shallow and the milk will splash all over from the force of the steam. The bell-shaped pitchers are best because the shape helps keep the milk from being splashed out of the pitcher. |
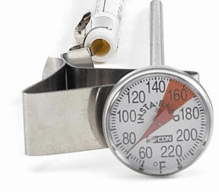 |
Using a Steaming ThermometerIt is an excellent idea to use a steaming thermometer with a clip that holds it in the pitcher. Being able to monitor the temperature will be very helpful, particularly if you are new to this process. You should already have the espresso in the cups in which the beverages will be served. For cappuccinos a cup should be about 6 ounces and for a latte, as large as you like.Once the steam pressure has built up in the machine, pour the desired amount of milk into the pitcher. Bleed any water from the wand so you can start with a good, dry steam. If water remains in the wand, its force will immediately blast milk out of the pitcher making a mess. |
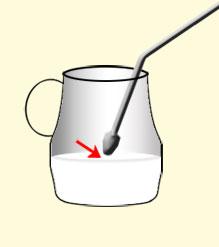 |
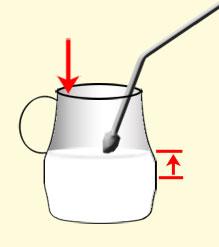
Step 1Immerse the tip in the milk about 1/4 inch and slowly turn up the steam valve. Once the steam begins flowing in earnest, and the milk begins to move about, lower the pitcher so that the tip of the wand is just at, or barely below, the surface. You are trying to introduce air into the milk. Listen for an intermittent hissing sound that will remind you of the ripping of linen bed sheets. The depth which the tip needs to be held depends on many factors such as the quality of the milk and the force of the steam. If the tip is held too far above or near the surface you will get big bubbles forming on the surface of the milk and that is not what you want at all. if the tip is too low, air is not being drawn into the milk and all you will get is hot milk. Another consideration is the location of the tip in the milk and its angle. If you have a one-hole steam tip, the best location is about 1/3 from the side of the jug and at an angle so that the milk is rapidly swirled in a circular motion around the inside of the pitcher, like water going down a drain. If you have a tip that has two or more holes, center the tip in the middle of the pitcher, and point it straight down. Multi-hole tips tend to swirl the milk in a direction that is not so easily seen, so closer attention is required. |
 |
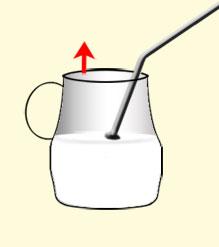
Step 2In the first fifteen seconds or so you will notice that the milk is gaining in volume. As the level of the milk rises it is important to keep the steam tip at the same level in relation to the milk, so you will need to slowly lower the pitcher as the milk rises. You are still introducing air while avoiding the creation of large bubbles. As the milk gains volume you will notice that the wand will need to be held a little deeper in the milk. The difference is very slight, but important. As mentioned earlier, the exact depth is found by trial and error as it is affected by many factors... |
 |
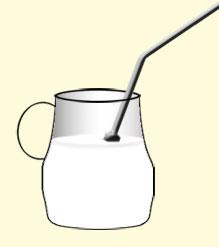
Step 3Here is where the steaming thermometer first becomes valuable. When the milk hits 100° F. it is time to stop introducing air. Raise the pitcher so that the steam tip is deeper in the milk. The milk should still be swirling about, and it will continue to gain in volume even though you are not mixing in any more air. |
 |
Step 4The pitcher will need to be slowly lowered as the milk rises. The goal is to keep the tip near the surface of the milk, but not so high that air is drawn in. During this time you are not only watching where the tip is positioned in the milk, but you need to also watch the temperature. When the milk hits about 140 degrees it is time to stop. Much further past this point and you take the risk of scalding the milk and losing all the delicious flavor that you have created. Turn off the steam valve, and when the steam stops (usually less than one second), remove the pitcher and immediately wipe the steam tip off with a wet rag. After wiping, rapidly open and close the steam valve once or twice. These forceful blasts of steam will clear any milk that may have gotten into the steam wand or the holes in the tip. If you look at the temperature of the milk now you may notice that it has risen. This depends on the power of your machine, but the milk should have hit about 150 degrees. This is why you needed to stop a bit early. If the temperature of your milk did not rise this much, the next time try steaming a bit longer— try 145 degrees. If there are some bubbles showing on the surface of the milk you can eliminate them by tapping the pitcher downward on the counter. Do this with a gentle force since hitting the pitcher too forcefully will literally bounce milk out of the pitcher. For a smoother and consistent texture, hold the bottom of the pitcher flat on the counter and spin the stretched milk using a small, gentle circular motion of the pitcher. The milk in the pitcher will consist of stiff foam on top and stretched milk below. You can use the milk just as it is by simply pouring from the pitcher into the serving cup. Add the espresso first, then just pour in the stretched milk. For a traditional cappuccino, use the backside of a spoon held against the pitcher to hold in the stiff foam and pour only stretched milk into the cup. At the end, spoon some stiff foam into the middle of the cup. A latte can be anything you like— use as much (or as little) espresso, milk or stiff foam as you like. The same can be said for the size of the glass or mug. |
Hints and Tips
If you find that things are happening too quickly, try this: As you begin your preparations, fill the steaming pitcher with the desired amount of milk and place it in the freezer for about ten minutes. This will chill the milk as well as the pitcher. Cold milk takes longer to heat and this will give you more time to work.
If you are not getting good results no matter what you do, try changing brands of milk. Economy milk is often from cows fed lower quality feed, and the proteins in these milks react differently to steaming.
If a thermometer is not available you can sense the 100 degree point by placing the palm of your hand on the side of the pitcher. It is about the time that the pitcher gets warm, approaching uncomfortably so. The 140° to 150° point is when the milk starts making a rumbling sound. If you hear even a hint of that sound, stop immediately.